with ItemHierarchy (UniqueID, Name, ParentID, Path, Level) as
(
 select fol.UniqueID, fol.Name, fol.ParentID, CAST(fol.Name as varchar(max)), 0
 from FOLDERS fol
 where fol.ParentID IS NULL

 union all

 select fol.UniqueID, fol.Name, fol.ParentID, CAST(par.Path + '\' + fol.Name AS varchar(max)), par.Level + 1
 from FOLDERS fol
 inner join ItemHierarchy par on fol.ParentID = par.UniqueID
)
select pol.Name as 'PolicyName', ith.Name as 'FolderName', ith.Path as 'Folder Path'
from POLICIES pol
inner join ItemHierarchy ith on pol.ParentID = ith.UniqueID
where pol.Name like '%RunbookName%'
Thursday, September 26, 2019
SCORCH: Find runbook in folder structure
When you know a runbook exists but you can't find the folder it resides in, you can try this SQL query.
To retrieve the complete path from the root of the folder structure down to the runbook, i used a Common Table Expression (CTE).
It works like a recursive function.


Wednesday, February 28, 2018
SCCM: Copy product categories from WSUS to SUP
For a project where Patch Management was migrated from WSUS to SCCM (SUP with new WSUS) i needed to create a list of product categories and sync them with the categories in SCCM.
This script retrieves a list of selected product categories from an WSUS server and searches for the corresponding category on your Software Update Point. It then will enable the subscription for this specific category.
As a precaution you have to change the scanOnly variable to actually enable this/
Before all this, the script will first create a backup of your current selected categories and export it to a timestamped CSV file.
#requirements
Script
This script retrieves a list of selected product categories from an WSUS server and searches for the corresponding category on your Software Update Point. It then will enable the subscription for this specific category.
As a precaution you have to change the scanOnly variable to actually enable this/
Before all this, the script will first create a backup of your current selected categories and export it to a timestamped CSV file.
#requirements
- SCCM console installed
- WSUS console installed
Script
Import-Module "$($ENV:SMS_ADMIN_UI_PATH)\..\ConfigurationManager.psd1" # Import the ConfigurationManager.psd1 module
$SiteCode = Get-PSDrive -PSProvider CMSITE
Set-Location "$($SiteCode.Name):\"

$supCatBackupPath = "C:\SCCM_SUP_Subscribed_ProductCategories_$(Get-Date -Format 'yyyyMMdd_HHmmss').csv"
$onlyScan = $true #Change this to $False if you are sure to change the Software Update Point categories.

#get current selected SUP categories
$subscribedCats = Get-CMSoftwareUpdateCategory -Fast | ? { $_.IsSubscribed -And $_.CategoryTypeName -eq "ProductFamily" -Or $_.CategoryTypeName -eq "Product" }
#backup to CSV file
$subscribedCats | Export-CSV -Path $supCatBackupPath -Delimiter ";"

$wsusserver = "myWSUSserver"
$wsusport = 8530

[reflection.assembly]::LoadWithPartialName("Microsoft.UpdateServices.Administration") | Out-Null
$wsus = [Microsoft.UpdateServices.Administration.AdminProxy]::getUpdateServer($wsusserver,$False,$wsusport)
$wsusSubscription = $wsus.GetSubscription()
$selectedProducts = $wsusSubscription.GetUpdateCategories() | Select Title
$selectedProducts

$selectedProducts.Title | % {
    $_
    $supCat = Get-CMSoftwareUpdateCategory -Fast -Name "$_"
    if($supCat.IsSubscribed -eq $False) {
        Write-Host -ForegroundColor Red "Not subscribed"
        if($onlyScan -eq $False) {
            $supCat.IsSubscribed = $true
            $supCat.Put()
        } else {
            Write-Host "scan only, not changing..."
        }
    } else {
        Write-Host "Already subscribed"
    }
}
Thursday, January 18, 2018
SCCM - Download Software Updates with PowerShell
After you setup your new SCCM environment, it can be time consuming to download all Software Updates and place them in the right deployment package.
This is an example of how you could automate that with PowerShell.
It will download all software updates contained in the given Software Update Group and will save and download them to an already created deployment package.
$sugDeployment = "Deployment Group - 2017 - Microsoft Updates - Non-OS"
$dpkg = "Deployment Package - 2017 - Microsoft Updates - Non-OS"
$supLanguages = @("English","Dutch")
Get-CMSoftwareUpdateGroup -Name $sugDeployment | Save-CMSoftwareUpdate -DeploymentPackageName $dpkg -Verbose -SoftwareUpdateLanguage $supLanguages
Creating a deployment package with PowerShell is also possible, but remember you need to create the path on the filesystem yourself.
Monday, December 18, 2017
SCCM: Query collection membership for specific system
Beneath you find a WQL query for listing all collection memberships for a specific system in SCCM
I got some examples of the internet which didn't work for me. This query does and uses a prompt asking for a system resource name.
select COL.Name from SMS_Collection as COL
JOIN SMS_FullCollectionMembership as COLMEM on COL.CollectionID = COLMEM.CollectionID where COLMEM.Name = ##PRM:SMS_FullCollectionMembership.Name##
order by COL.Name
You can use this query within SCCM solely as a Query or as a collection membership query. For SQL queries and reports take a look here
Thursday, December 14, 2017
PowerShell: Encapsulate 64 bit cmdlet in a 32 bit context
Found a rather old but nice tip from Neil Peterson to tackle a challenge executing Powershell 64 bit cmdlets from a 32 bit execution context (Orchestrator in his example).
Just wanted to share this and add it to my own blog for enhancing my toolbox.
#living in a 32 bit universe

#starting PowerShell 'sysnative' version and thus 64 bit
#more info: https://msdn.microsoft.com/en-us/library/windows/desktop/aa384187(v=vs.85).aspx

$ClusterNodes = .$env:windir\sysnative\WindowsPowerShell\v1.0\powershell.exe {

 #living in a 64 bit universe
 Get-ClusterNode -Cluster clustername

}
Monday, July 3, 2017
SCOM: Using [bracket] NoteProperties in PowerShell
What are those brackets [] in PowerShell!!??
When you query class instances, you'll see a numer of properties available of the type 'NoteProperty'. Direct or inherited from parent classes. To use or filter on these class instance properties in PowerShell, you need to use a specific syntax.
You either enclose with single quotes or escape with backtick. In this example i'm using an instance of the 'Windows Server' class from one of the default SCOM management packs. This class inherits the property 'IPAddress' from the base class 'Windows Computer'.
Here are the useable options for PowerShell:
You either enclose with single quotes or escape with backtick. In this example i'm using an instance of the 'Windows Server' class from one of the default SCOM management packs. This class inherits the property 'IPAddress' from the base class 'Windows Computer'.
Here are the useable options for PowerShell:
#Get all available properties
Get-SCOMClass -DisplayName "Windows Server" | Get-SCOMClassInstance | Get-Member
...
[Microsoft.Windows.Computer].ActiveDirectoryObjectSid
[Microsoft.Windows.Computer].ActiveDirectorySite
[Microsoft.Windows.Computer].DNSName
[Microsoft.Windows.Computer].DomainDnsName
[Microsoft.Windows.Computer].ForestDnsName
[Microsoft.Windows.Computer].HostServerName
[Microsoft.Windows.Computer].IPAddress
[Microsoft.Windows.Computer].IsVirtualMachine
[Microsoft.Windows.Computer].LastInventoryDate
[Microsoft.Windows.Computer].LogicalProcessors
[Microsoft.Windows.Computer].NetbiosComputerName
[Microsoft.Windows.Computer].NetbiosDomainName
[Microsoft.Windows.Computer].NetworkName
[Microsoft.Windows.Computer].OffsetInMinuteFromGreenwichTime
[Microsoft.Windows.Computer].OrganizationalUnit
[Microsoft.Windows.Computer].PhysicalProcessors
[Microsoft.Windows.Computer].PrincipalName
[Microsoft.Windows.Computer].VirtualMachineName
...

#
# Using a NoteProperty
# ** Where-Object / ForEach-Object clause **

{ $_.'[Microsoft.Windows.Computer].IPAddress'.Value }

# ** Select-Object **
Select-Object ``[Microsoft.Windows.Computer`].IPAddress
Select-Object *.IPAddress

# ** Change column name or object property name **
# Looks like the syntax for Where-Object, but 'Value' subproperty is not specified!
Select-Object @{Expression={$_.'[Microsoft.Windows.Computer].IPAddress'};Label="IP"}
Wednesday, September 28, 2016
SCCM: Using Cmdlets from SCCM PowerShell Module
If you want to use PowerShell with SCCM, you can do two things.
You can verify this with the command Get-PSDrive command
When the CMSite PowerShell Drive is not available, you can create it yourself and connect to the SCCM site. The only parameter you need is the name of the Site Server which hosts the SMS Provider. This is usually the Primary Site Server.
How to add the CMSite PSDrive manually:
More info:
http://www.hasmug.com/2016/04/25/easily-document-configmgr-client-settings-with-powershell/ (thanks for the csv function!)
http://www.verboon.info/2013/05/powershell-script-to-retrieve-sccm-2012-client-settings/
https://blogs.technet.microsoft.com/enterprisemobility/2013/03/27/powershell-connecting-to-configuration-manager/
- Load the PowerShell through the SCCM Console (left top corner: Connect via Windows PowerShell)
- Load the PowerShell module manually
import-module($Env:SMS_ADMIN_UI_PATH.Substring(0,$Env:SMS_ADMIN_UI_PATH.Length-5) + '\ConfigurationManager.psd1')
You can verify this with the command Get-PSDrive command
Get-PSDrive -PSProvider CMSite
When the CMSite PowerShell Drive is not available, you can create it yourself and connect to the SCCM site. The only parameter you need is the name of the Site Server which hosts the SMS Provider. This is usually the Primary Site Server.
How to add the CMSite PSDrive manually:
New-PSDrive -Name "SCCM" -PSProvider CMSite -Root "<SCCM_SERVER>"
cd SCCM:
Of course you can use whatever name you want.
More info:
http://www.hasmug.com/2016/04/25/easily-document-configmgr-client-settings-with-powershell/ (thanks for the csv function!)
http://www.verboon.info/2013/05/powershell-script-to-retrieve-sccm-2012-client-settings/
https://blogs.technet.microsoft.com/enterprisemobility/2013/03/27/powershell-connecting-to-configuration-manager/
Monday, May 30, 2016
SCOM: View Folder Path hierarchy (PowerShell)
So we're six years older and still there was a small thing that I still had not fixed.
It concerned the full view folder path of a SCOM Monitoring View.
In the past I wrote numerous PowerShell scripts which involved the views. Now I finally found some time to create a function to get the folder hierarchy of a given View by it's ID (guid).
Why I never thought about solving it like this, i don't know, but it appeared to be not that hard. It's a simple recursive function.
In the future I'll update the existing scripts concerning the User Scopes and will also upload a nice script which shows a complete report about all the dependancies between Management Packs and their objects used in User Roles and Notifications. This comes in handy, when you want to phase out management packs but don't know whether there are User Roles and Notification Subscriptions involved.
Enjoy.
In the past I wrote numerous PowerShell scripts which involved the views. Now I finally found some time to create a function to get the folder hierarchy of a given View by it's ID (guid).
Why I never thought about solving it like this, i don't know, but it appeared to be not that hard. It's a simple recursive function.
In the future I'll update the existing scripts concerning the User Scopes and will also upload a nice script which shows a complete report about all the dependancies between Management Packs and their objects used in User Roles and Notifications. This comes in handy, when you want to phase out management packs but don't know whether there are User Roles and Notification Subscriptions involved.
Enjoy.
- $computerName should have a name of a valid Management Server
- $viewId needs to have a valid guid of an existing view in your SCOM environment.
New-SCOMManagementGroupConnection -ComputerName $computerName
$mg = Get-SCOMManagementGroup

function GetFolderHierarchy($folderId,$folderpath) {

    $parentfolderid = $null
    $tmpfolder = $mg.GetMonitoringFolder($folderId)
    $tmpfolderdisplayname = $tmpfolder.DisplayName

    if ($folderpath -eq "" -Or $folderpath -eq $null) {
        $folderpath = $tmpfolderdisplayname
    } else {
        $folderpath = $tmpfolderdisplayname + "\" + $folderpath
    }

    $parentfolderid = $tmpfolder.ParentFolder.id.Guid

    if ($parentfolderid -ne "" -And $parentfolderid -ne $null -And $tmpfolder.name -ne "Microsoft.SystemCenter.Monitoring.ViewFolder.Root") {
        GetFolderHierarchy $parentfolderid $folderpath
    } else {
        return $folderpath
    }

}

function GetViewHierarchy($viewId) {

    $tmpview = $mg.GetMonitoringView($viewId)
    $parentfolderid = $tmpview.ParentFolderIds.Guid | Select -First 1
    if($parentfolderid -ne "" -And $parentfolderid -ne $null) {
        $fullpath = GetFolderHierarchy $parentfolderid
        return $fullpath + "\" + $tmpview.DisplayName
    }
}

GetViewHierarchy $viewId
Wednesday, March 23, 2016
SCOM: Compare MP's between Management Groups with PowerShell
A short blog post about comparing management packs between SCOM environments
I know there are tools available to compare management packs, but that's no fun.
Creating this compare script with PowerShell to accomplish the same didn't cost me that much time.
And of course, doing it yourself with PowerShell is just more fun.
So here it is.
This script gives you a gridview with the differences, as well as an CSV output file.
Screenshots:


This script gives you a gridview with the differences, as well as an CSV output file.
#Compares unsealed/sealed MP's between two management groups
#Author: Michiel Wouters
#Date: 23-03-2016

[CmdletBinding()]
Param(
   [Parameter(Mandatory=$False)]
   [string]$ms1="server1", # A management server of the source environment, default value

   [Parameter(Mandatory=$False)]
   [string]$ms2="server2", # A management server of the target environment, default value

   [Parameter(Mandatory=$False)]
   [boolean]$Sealed=$True

)

New-SCOMManagementGroupConnection -ComputerName $ms1
$mmgtgrpconn1 = Get-SCOMManagementGroupConnection -ComputerName $ms1

New-SCOMManagementGroupConnection -ComputerName $ms2
$mmgtgrpconn2 = Get-SCOMManagementGroupConnection -ComputerName $ms2

Set-SCOMManagementGroupConnection -Connection $mmgtgrpconn1
$mgmtgrp1mps = Get-SCOMManagementPack | ? {$_.Sealed -eq $Sealed} | Select DisplayName, Name, Version | Sort DisplayName

Set-SCOMManagementGroupConnection -Connection $mmgtgrpconn2
$mgmtgrp2mps = Get-SCOMManagementPack | ? {$_.Sealed -eq $Sealed} | Select DisplayName, Name, Version | Sort DisplayName


#set SynWindow for compare object
if($mgmtgrp2mps.Count -gt $mgmtgrp1mps.count) {
    $SyncWindow = [math]::Ceiling($mgmtgrp2mps.Count/2)
}  else {
    $SyncWindow = [math]::Ceiling($mgmtgrp1mps.Count/2)
}

$comparison = Compare-Object -ReferenceObject $mgmtgrp1mps -DifferenceObject $mgmtgrp2mps -Property DisplayName, Name, Version -SyncWindow $SyncWindow | Sort DisplayName
#output to screen
$comparison | Out-GridView
#output to csv file
$comparison | Export-CSV -Path .\SCOM_MPDiff_$(Get-Date -Format "yyyyMMdd_HHmm").csv -NoTypeInformation -Delimiter ";"
Screenshots:


Wednesday, January 27, 2016
SCOM: SCOM 2016 Monitoring Wishes
I noticed on the System Center: Operations Monitoring Engineering Blog that there's a request for which monitoring workloads you would like to see in SCOM 2016.
So this is your chance:
http://blogs.technet.com/b/momteam/archive/2016/01/22/what-new-workloads-would-you-like-scom-2016-to-monitor.aspx
For myself, I really would like to see more effort to let end-users do more Authoring for themselves, instead of being fully dependant on the Authoring team within organizations.
As for workloads: Enhanced user experience monitoring would be nice and also more functional monitoring workloads would be a nice addon (like querying specific data in a DB) and write that data back for performance history and reporting.
So this is your chance:
http://blogs.technet.com/b/momteam/archive/2016/01/22/what-new-workloads-would-you-like-scom-2016-to-monitor.aspx
For myself, I really would like to see more effort to let end-users do more Authoring for themselves, instead of being fully dependant on the Authoring team within organizations.
As for workloads: Enhanced user experience monitoring would be nice and also more functional monitoring workloads would be a nice addon (like querying specific data in a DB) and write that data back for performance history and reporting.
Wednesday, February 25, 2015
SCOM: New version available MP Author SP3
Silect just released a new version, SP3, of MP Author, a free and easy to use tool for creating SCOM management pack.
Check it out: http://www.silect.com/mp-author
Soms welcome new features:
- Improved knowledge viewing and editing in multiple language environments
- Improved XML editing
- New feature to "Check for missing display names" (Nice one when MP's are authored by multiple users with different UI locales)
- Added ability to use base classes other than LocalApplication when creating new classes
- Additional MP elements are displayed
- Added a drop down list of $$ parameters for alert messages (less Traffic for Kevin Holman's blog ;))
- Schedule property grid made more user friendly
- Improvements to memory usage
- Improved knowledge viewing and editing in multiple language environments
- Improved XML editing
- New feature to "Check for missing display names" (Nice one when MP's are authored by multiple users with different UI locales)
- Added ability to use base classes other than LocalApplication when creating new classes
- Additional MP elements are displayed
- Added a drop down list of $$ parameters for alert messages (less Traffic for Kevin Holman's blog ;))
- Schedule property grid made more user friendly
- Improvements to memory usage
But, the use of notepad, XML editor and Authoring Console still comes in handy. Or use the Visual Studio addins for authoring.
Tuesday, December 16, 2014
Hyper-V: Internet Connection Sharing (ICS) with Hyper-V Virtual Switch
I'm running Hyper-V on a new machine with Windows 8.1 Update 1 and updated with the latest patches. I'm running in to issues sharing internet access from my wireless network with my VM's. This post describes a solution which worked in my case.
I prefer option 2 and therefore created a Virtual Switch and shared my Wifi connection with that Virtual Switch.
But for some reason the guest system did not get access to the internet, but did get a DHCP lease from the interface I shared with the Virtual Switch to which the VM was connected.
Searching through the internet only resulted either in sharing your internet with an hosted network on WiFi (adhoc) or describing setting up Internet Connection Sharing (ICS) as it was supposed to work.
The command (elevated) to see whether your WLAN driver supports Hosted Network is:

So what if this command also worked to show details about the LAN interface?
Nope...that command is not supported.
But what DOES work is showing the available LAN interfaces with the command:

This showed no information about LAN interfaces, but a statement about the Wired AutoConfig Service.
Aha, currently i'm not connected to a LAN. Actually I always use Wifi whenever possible.

After enabling this service, I got some results back from netsh.

Follow the steps:


Internet access for Hyper-V virtual machine
To give your VM's access to the internet through your computer there are multiple options- Create an external switch and let the guest system connect to the actual network
- Create an internal switch and share your internet connection with that Virtual Switch
I prefer option 2 and therefore created a Virtual Switch and shared my Wifi connection with that Virtual Switch.
But for some reason the guest system did not get access to the internet, but did get a DHCP lease from the interface I shared with the Virtual Switch to which the VM was connected.
Searching through the internet only resulted either in sharing your internet with an hosted network on WiFi (adhoc) or describing setting up Internet Connection Sharing (ICS) as it was supposed to work.
Troubleshooting
The Wi-Fi Hosted Network brought my to the idea that infact the hosted network was also a way to let incoming connection route through the cabled interface of the host.The command (elevated) to see whether your WLAN driver supports Hosted Network is:
netsh wlan show driver
So what if this command also worked to show details about the LAN interface?
Nope...that command is not supported.
But what DOES work is showing the available LAN interfaces with the command:
netsh ip show interfaces
This showed no information about LAN interfaces, but a statement about the Wired AutoConfig Service.
Aha, currently i'm not connected to a LAN. Actually I always use Wifi whenever possible.
Enable the Wired AutoConfig service through services.msc
After enabling this service, I got some results back from netsh.
WLAN/Wi-Fi ICS with Virtual Switch - another try
Now let's try that second method again to share internet access. (By the way, this also solved another issue on my Hyper-V host when i want to create Virtual Switches in the first case.)Follow the steps:
- Create an internal virtual switch through the Virtual Switch Manager (give it a descriptive name like vSwitch - Shared)
- Share your active internet connection with that vSwitch
- Add a network adapter to your VM which connect to that vSwitch
- Verify internet access on the guest OS. Yeeh!
Cause?
What's the cause of this? I think it's maybe because the Wired AutoConfig Service is possibly triggered when using a physical interface and I use a WiFi connection. Haven't tested this yet though.
But after changing the Windows display language from Dutch to English (US) it also seems to be working. Hhmm?
Maybe this is caused by a specific configuration on my system, but if this post works for you, than I'm glad I shared this.
What's the cause of this? I think it's maybe because the Wired AutoConfig Service is possibly triggered when using a physical interface and I use a WiFi connection. Haven't tested this yet though.
But after changing the Windows display language from Dutch to English (US) it also seems to be working. Hhmm?
Maybe this is caused by a specific configuration on my system, but if this post works for you, than I'm glad I shared this.
Tuesday, November 11, 2014
Powershell: Searching for special characters? Get them all!
Today I wanted to see if I could add a checkbox like character to a custom table from Powershell.
Because of the nature of a command line script, I wanted to see if there were any interesting character codes to do this.
In Powershell you can use specific characters with the command [char]#.
You can use this command line to output all characters from a specific range (default is 0-10000). Have fun!
Output looks like this:
Because of the nature of a command line script, I wanted to see if there were any interesting character codes to do this.
In Powershell you can use specific characters with the command [char]#.
You can use this command line to output all characters from a specific range (default is 0-10000). Have fun!
for($i=0;$i -le 10000;$i++){Write-Host -NoNewLine "$i $([char]$i) "; $k++ ; if($k -ge 15){Write-Host "";$k=0}}
Output looks like this:
9819 ♛ 9820 ♜ 9821 ♝ 9822 ♞ 9823 ♟ 9824 ♠ 9825 ♡ 9826 ♢ 9827 ♣ 9828 ♤ 9829 ♥ 9830 ♦ 9831 ♧ 9832 ♨ 9833 ♩
9834 ♪ 9835 ♫ 9836 ♬ 9837 ♭ 9838 ♮ 9839 ♯ 9840 ♰ 9841 ♱ 9842 ♲ 9843 ♳ 9844 ♴ 9845 ♵ 9846 ♶ 9847 ♷ 9848 ♸
9849 ♹ 9850 ♺ 9851 ♻ 9852 ♼ 9853 ♽ 9854 ♾ 9855 ♿ 9856 ⚀ 9857 ⚁ 9858 ⚂ 9859 ⚃ 9860 ⚄ 9861 ⚅ 9862 ⚆ 9863 ⚇
9864 ⚈ 9865 ⚉ 9866 ⚊ 9867 ⚋ 9868 ⚌ 9869 ⚍ 9870 ⚎ 9871 ⚏ 9872 ⚐ 9873 ⚑ 9874 ⚒ 9875 ⚓ 9876 ⚔ 9877 ⚕ 9878 ⚖
9879 ⚗ 9880 ⚘ 9881 ⚙ 9882 ⚚ 9883 ⚛ 9884 ⚜ 9885 ⚝ 9886 ⚞ 9887 ⚟ 9888 ⚠ 9889 ⚡ 9890 ⚢ 9891 ⚣ 9892 ⚤ 9893 ⚥
9894 ⚦ 9895 ⚧ 9896 ⚨ 9897 ⚩ 9898 ⚪ 9899 ⚫ 9900 ⚬ 9901 ⚭ 9902 ⚮ 9903 ⚯ 9904 ⚰ 9905 ⚱ 9906 ⚲ 9907 ⚳ 9908 ⚴
9909 ⚵ 9910 ⚶ 9911 ⚷ 9912 ⚸ 9913 ⚹ 9914 ⚺ 9915 ⚻ 9916 ⚼ 9917 ⚽ 9918 ⚾ 9919 ⚿ 9920 ⛀ 9921 ⛁ 9922 ⛂ 9923 ⛃
9924 ⛄ 9925 ⛅ 9926 ⛆ 9927 ⛇ 9928 ⛈ 9929 ⛉ 9930 ⛊ 9931 ⛋ 9932 ⛌ 9933 ⛍ 9934 ⛎ 9935 ⛏ 9936 ⛐ 9937 ⛑ 9938 ⛒
9939 ⛓ 9940 ⛔ 9941 ⛕ 9942 ⛖ 9943 ⛗ 9944 ⛘ 9945 ⛙ 9946 ⛚ 9947 ⛛ 9948 ⛜ 9949 ⛝ 9950 ⛞ 9951 ⛟ 9952 ⛠ 9953 ⛡
9954 ⛢ 9955 ⛣ 9956 ⛤ 9957 ⛥ 9958 ⛦ 9959 ⛧ 9960 ⛨ 9961 ⛩ 9962 ⛪ 9963 ⛫ 9964 ⛬ 9965 ⛭ 9966 ⛮ 9967 ⛯ 9968 ⛰
9969 ⛱ 9970 ⛲ 9971 ⛳ 9972 ⛴ 9973 ⛵ 9974 ⛶ 9975 ⛷ 9976 ⛸ 9977 ⛹ 9978 ⛺ 9979 ⛻ 9980 ⛼ 9981 ⛽ 9982 ⛾ 9983 ⛿
9984 ✀ 9985 ✁ 9986 ✂ 9987 ✃ 9988 ✄ 9989 ✅ 9990 ✆ 9991 ✇ 9992 ✈ 9993 ✉ 9994 ✊ 9995 ✋ 9996 ✌ 9997 ✍ 9998 ✎
9999 ✏ 10000 ✐
Tuesday, April 8, 2014
Microsoft Azure Automation preview!
This is just great! Automation on-premise is what we already know and on which we are currently are automatizing our processes. Yet, as we are busy doing just that, Microsoft is working on automation in the Azure cloud! Earlier this week they made a public preview of Azure Automation available.
Read this blog from Keith Mayer to follow a step-by-step approach getting started with Azure Automation. Furthermore, in the future they will publish information about using other products like Chef with Windows Azure.
Quote from Keith's blog:
More info on Microsoft Azure Automation: http://azure.microsoft.com/en-us/documentation/services/automation/
Have fun! I know I will...
Read this blog from Keith Mayer to follow a step-by-step approach getting started with Azure Automation. Furthermore, in the future they will publish information about using other products like Chef with Windows Azure.
Quote from Keith's blog:
Note: this week, we also announced support for Puppet and Chef for automated provisioning and configuration management of Microsoft Azure cloud resources. If you're currently using these tools as part of your DevOps strategy, be sure to look for upcoming articles that focus on these alternatives for cloud automation.Link to article: http://blogs.technet.com/b/keithmayer/archive/2014/04/04/step-by-step-getting-started-with-windows-azure-automation.aspx
More info on Microsoft Azure Automation: http://azure.microsoft.com/en-us/documentation/services/automation/
Have fun! I know I will...
Friday, January 24, 2014
Powershell: Divide text file lines between two files (req.)
This week I received a question about a Powershell script I wrote to split large text files to multiple files.
So I decided to answer that with blog post in which a similar script divides lines of a text files between two text files. Nothing fancy, it's rather basic script :)
This script just checks whether the line count increment is either odd or even. Based on that outcome, the results goes to output file 1 or 2.
So I decided to answer that with blog post in which a similar script divides lines of a text files between two text files. Nothing fancy, it's rather basic script :)
This script just checks whether the line count increment is either odd or even. Based on that outcome, the results goes to output file 1 or 2.
#Script initialization
$linecount = 0
$sourcefilename = Read-Host "What is the full path and name of the log file from which you want to divide the lines? (e.g. D:\mylogfiles\mylog.txt) "
$destinationfolderpath = Split-Path $sourcefilename -parent

$srcfile = gci $sourcefilename
$filebasename = $srcfile.BaseName
$fileext = $srcfile.Extension

#Functions
Function check-even ($num) {[bool]!($num%2)}

#Main
Get-Content $sourcefilename | Measure-Object | ForEach-Object { $sourcelinecount = $_.Count }

Write-Host "Your current file size is $sourcelinecount lines long"
Write-Host File is $sourcefilename - destination is $destinationfolderpath

$content = get-content $sourcefilename | % {
 $linecount ++
 If(Check-Even($linecount)) {
    Write-Host "Writing part: $destinationfolderpath\$filebasename`_part2$fileext"
    Add-Content $destinationfolderpath\$filebasename`_part2$fileext "$_"
 } else {
    Write-Host "Writing part: $destinationfolderpath\$filebasename`_part1$fileext"
    Add-Content $destinationfolderpath\$filebasename`_part1$fileext "$_"
  }
}
SCOM: Great start of new year - New MP Authoring Tool
This year started awesome with the introduction of a new MP authoring tool for SCOM, released by Silect.
It has a very descriptive name :), MP Author.
I really hope this will enable more people to create useable monitoring functionality in Operations Manager.
While I still don't understand why Microsoft has not solved the issue in which the Authoring role within OpsMgr can't use the Monitoring Templates (startingpoint for authoring?), this tool could be a solution for those who do not feel comfortable with the current Authoring Pane or VSAE.
Read about it at: http://blogs.technet.com/b/momteam/archive/2014/01/13/mp-blog-the-right-tool-for-the-right-job.aspx
(The SCOM 2012 Operations Console is a prerequisite for installing MP Author)
It has a very descriptive name :), MP Author.
I really hope this will enable more people to create useable monitoring functionality in Operations Manager.
While I still don't understand why Microsoft has not solved the issue in which the Authoring role within OpsMgr can't use the Monitoring Templates (startingpoint for authoring?), this tool could be a solution for those who do not feel comfortable with the current Authoring Pane or VSAE.
Read about it at: http://blogs.technet.com/b/momteam/archive/2014/01/13/mp-blog-the-right-tool-for-the-right-job.aspx
(The SCOM 2012 Operations Console is a prerequisite for installing MP Author)
Wednesday, August 7, 2013
SCOM 2012 R2 Cross-Platform Agent: R2 vs SP1
In this blog post I will show what's different under the hood (at first glance) between the cross-platform agents of OpsMgr 2012 R2 and OpsMgr 2012 SP1. This post will probably be updated as I'll find more to share.
Both agents are running on Ubuntu 12.04.1 LTS. I use the root account for administration. I know, I should not use it, but hey what the heck. It's just a test environment. The SSH client I use is PuTTY.
When you run the command "scxadmin -status" you get the same kind of response. But you can see that the programs are replaced with OMI versions.
R2
SP1

Command: scxadmin -version
R2
SP1
SP1
SP1
Both agents are running on Ubuntu 12.04.1 LTS. I use the root account for administration. I know, I should not use it, but hey what the heck. It's just a test environment. The SSH client I use is PuTTY.
Status Information
In both versions the 'scxadmin' tool is available.When you run the command "scxadmin -status" you get the same kind of response. But you can see that the programs are replaced with OMI versions.
R2
 |
| Note the change in server and agent name (omi) |

Version differences
Retrieved with scxadmin (still available in R2)Command: scxadmin -version
R2
 |
| Version: 1.5.0-114 |
 |
| Agent Management (Console) |
SP1
 |
| 1.4.0-906 |
 |
| Agent Management (Console) |
Files & Folders
There are noticeable differences in the binaries used in R2 and SP1. This is because of the change from OpenPegasus to OMI. Some binaries are still used but renamed, like 'cimcli'.
R2
 |
| R2: Less binaries than SP1, provider binaries removed. OMI has other tools for that. See the OMI getting started guide: download here |
 |
| SP1: More and other binaries than R2 |
Using WS-Man
Microsoft stated that the upgrade to R2 is seamless except when using custom providers. So testing the response with WS-Man should return the same result.
For the test I use an Invoke example which I used earlier.
The property StdOut is still the same. This is the result of the command 'uname -a'.
The result is the same, but the XmlElement which is returned by the server has some slight body changes.
The XML response (minor diffs):
n1 => p
true => TRUE
URI => Changed to DMTF. So it looks like the interface is committed to use the DMTF schema.
R2
 |
| R2 WS-Man result: DMTF schema used |
 |
| SP1 WS-Man result: Microsoft schema used |
CIMCLI issue in R2
The cimcli tool is used in both OpenPegasus and OMI.
Microsoft renamed the tool from 'scxcimcli' to just 'cimcli'.
I found that the cimcli tool contained in the R2 agent (Ubuntu) does not work. SP1 does. It can't find the libomiclient.so file. Currently I haven't tested other agents for the other OS's to see if those contain the same issue. (Downloading Suse Enterprise Linux as we speak)
I tried all kind of things to get cimcli to work, but it keeps failing to run. I copied the lib directory contents to the bin contents, added omicli.conf to the conf directory, added .omiclirc to the cimcli directory.
Got that information from: http://cvs.opengroup.org/cgi-bin/viewcvs-omi.cgi/*checkout*/omi/doc/omi/omi.html?rev=HEAD&content-type=text/html#TOC16
Command: (scx)cimcli ns
This enumerates the available namespaces of the CIM server.
R2
 |
| Failure: libomiclient.so is missing |
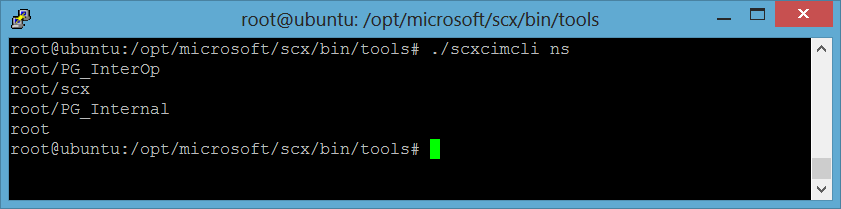 |
| Microsoft's scx namespace. Also note the two Pegasus (PG) namespaces |
If you have any feedback on my findings, please let me know.
Tuesday, August 6, 2013
SCOM 2012 R2 Cross-Platform (XPlat) OMI changes
OMI replaces OpenPegasus
One of the changes in the R2 release (expected fall 2013) is the change of management platform for the cross-platform agents to monitor Linux and UNIX systems. The supported cross-platform systems are: Linux (RedHat, SUSE, CentOS, Debian, Oracle and Ubuntu) and UNIX (AIX, HP-UX and Solaris).In the current 2012 version the cross-platform agents are built-upon the OpenPegasus standard. This is an open-source implementation of DMTF CIM and WBEM.
With the focus on becoming a Cloud OS, Microsoft needed a new abstraction layer for standard-based management which could be used to manage different kind of devices and abstractions (from cloud to physical device). The current standard had some caveats that did not line up with Microsoft standards-based management vision for the future.
That’s why Microsoft decided to use OMI* (Open Management Infrastructure) to replace OpenPegasus in the cross-platform agents.

If you want to know more about Microsoft’s reasons for this change, read their blog: http://blogs.technet.com/b/windowsserver/archive/2012/06/28/open-management-infrastructure.aspx
Besides the benefits of using a new standards-based management interface for top-to-bottom management, OMI performs significantly better than its predecessor. The footprint is smaller, making it better suitable for mobile devices.

* Previously known as NanoWBEM
More info on OMI: https://collaboration.opengroup.org/omi/
Seamless upgrade
Upgrading to SCOM 2012 R2 is seamless. The same goes for your own cross-platform Management Packs using the standard Microsoft provider (root\scx). As long as you used the Management Pack Types and provider which came out-of-the-box there is nothing to be worried about.
What's affected?
Management Packs that use OpenPegasus providers will not be compatible with the new agents. Vendors or customers who have written custom OpenPegasus provider have to rebuild their management packs to be based on the new OMI framework. If customers don’t upgrade to those new Management Packs or vendors are unable to redo their Management Packs, your upgrade to SC 2012 R2 will render that monitoring unusable, and errors might occur. For what I've seen, management packs from vendors like NiCE and Bridgeways use their own custom OpenPegasus providers.
Other options
 Some cross-platform management packs do not make use of custom providers. One of those is the Oracle MP from OpsLogix.
SCOM 2012 R2 (Preview) changes
I'm currently looking into the changes coming with the R2 release of SCOM 2012 R2.
A lot of new features are presented with this new release. Features like 360 Fabric Monitoring and better integration with VMM give administrations a complete overview of their private cloud. Extended with the updated Azure management pack, you now can complement this overview.
User experience is enhanced by improved dashboards performance. A very nice welcome feature is Java APM (Application Performance Monitoring), this will have the same experience as the existing .NET APM monitoring capabilities. Java APM allows you to monitor application performance from a server and client side perspective.
For what I've read about Java APM, it's not exactly the same as .NET APM, (byte-code instrumentation as someone called it)
Together with enhanced IntelliTrace support and improved TFS integration this will help your DevOps strategy to bring development and application management closer together.
Microsoft decided to change the cross-platform management interface. This could impact you, if you develop cross-platform management packs. See my next blog for that.
Want to see it for yourself? Download the evaluation package: http://technet.microsoft.com/en-US/evalcenter/dn205295.aspx
Need to convince your manager to get budget for upgrading to R2? Get the white paper here :)
A lot of new features are presented with this new release. Features like 360 Fabric Monitoring and better integration with VMM give administrations a complete overview of their private cloud. Extended with the updated Azure management pack, you now can complement this overview.
User experience is enhanced by improved dashboards performance. A very nice welcome feature is Java APM (Application Performance Monitoring), this will have the same experience as the existing .NET APM monitoring capabilities. Java APM allows you to monitor application performance from a server and client side perspective.
For what I've read about Java APM, it's not exactly the same as .NET APM, (byte-code instrumentation as someone called it)
Together with enhanced IntelliTrace support and improved TFS integration this will help your DevOps strategy to bring development and application management closer together.
Microsoft decided to change the cross-platform management interface. This could impact you, if you develop cross-platform management packs. See my next blog for that.
Want to see it for yourself? Download the evaluation package: http://technet.microsoft.com/en-US/evalcenter/dn205295.aspx
Need to convince your manager to get budget for upgrading to R2? Get the white paper here :)
Friday, August 2, 2013
SCOM: Invoke method on cross-platform agents with PowerShell
In this post i'll show you how a cross-platform agent can be tested. This is something which Daniele Muscetta already found out. But I also wanted to know how I could troubleshoot cross-platform agents, to test, for example, why a specific workflow like 'run a ssh command' would not work from a management pack. And yes, PowerShell can be used for that, with the Invoke-WSManAction cmdlet.
About Cross-Platform Agents
For those who ever have worked with the cross-platform agents in SCOM, you probably know that they work different than the Windows agents.
Where Windows Agents run their workflows locally on the client, the workflows for cross-platform/xplat agents are ran from the Management Servers.
Windows systems support different ways of remote connecting, not present in cross-platform systems. Cross-platform agents are actually listeners based on WS-Man, Web Services-Management. This makes use of a SOAP-based protocol.
When the Management Server starts a workflow, it connects to the cross-platform agent through WS-Man. It retrieves the required information and processes the returned information.
Connecting with cross-platform agents
I'll won't copy the post of Daniele Muscetta here. These are the main requirements when connecting from any client other than a management server. If you don't use this option, you'll have to add the agent to the trusted hosts list of the WS-Man client on the computer you are working on and allow unencrypted traffic.
To test a cross-platform agent with PowerShell I use the following cmdlets:


About Cross-Platform Agents
For those who ever have worked with the cross-platform agents in SCOM, you probably know that they work different than the Windows agents.
Where Windows Agents run their workflows locally on the client, the workflows for cross-platform/xplat agents are ran from the Management Servers.
Windows systems support different ways of remote connecting, not present in cross-platform systems. Cross-platform agents are actually listeners based on WS-Man, Web Services-Management. This makes use of a SOAP-based protocol.
When the Management Server starts a workflow, it connects to the cross-platform agent through WS-Man. It retrieves the required information and processes the returned information.
Connecting with cross-platform agents
I'll won't copy the post of Daniele Muscetta here. These are the main requirements when connecting from any client other than a management server. If you don't use this option, you'll have to add the agent to the trusted hosts list of the WS-Man client on the computer you are working on and allow unencrypted traffic.
- Connecting over SSL
- Download the agent's certificate (which is signed by the management server) with SCP (use WinSCP or FileZilla)
- Rename to .cer
- Open this certificate on the management server which installed the agent. This is because this server signed the certificate.
- Open the details tab, get the Root CA certificate, export it to a .cer file
- Add certificate to Trusted Root Certificate Authorities on your workstation's computer certificate store.
Or
- Untrusted connection (by default disabled for the WS-Man Windows client)
- Open Powershell (as Administrator)
- Enter: set-item WSMan:\localhost\Client\AllowUnencrypted "true"
- Enter: set-item WSMan:\localhost\Client\TrustedHosts "
"
Time to play
- Test-WSMan - Test whether a connection can be made
- Invoke-WSMan - Invoke an action that is accepted by the agent
Test-WSMan -computer linuxhost.contoso.local -port 1270 -authentication basic -credential (Get-Credential) -UseSSL

The output of the command is show above. The cmdlet shows the properties of the Cross-Platform agent.
Invoke-WSManAction -Action ExecuteCommand -Authentication Basic -ComputerName "linuxhost.contoso.local" -Credential (Get-Credential) -Port 1270 -ResourceURI http://schemas.microsoft.com/wbem/wscim/1/cim-schema/2/SCX_OperatingSystem?__cimnamespace=root/scx -UseSSL -ValueSet @{command="uname -a";timeout=30}
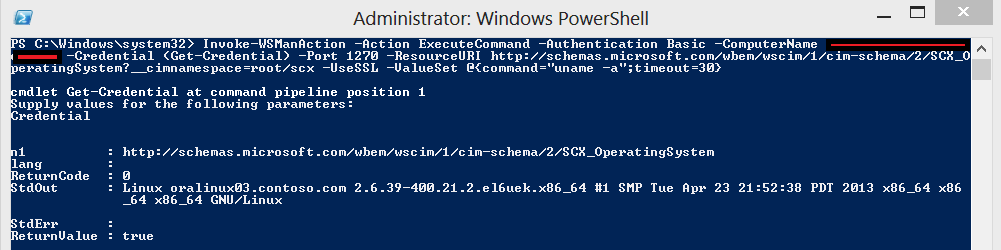
In this example I invoke the action "ExecuteCommand". For this cmdlet to work you need to add a ValueSet. These are the arguments for the ExecuteCommand method. I found the right syntax by trial and error. The need to be entered as a hashtable.
In this case, the arguments are 'command' and 'timeout'.
Technical documentaton about the Methods and the necessary arguments: http://technet.microsoft.com/en-us/library/dd789056.aspx. (not the best documented features sadly).
You can also take a look at the MP library: Microsoft.Unix.Library.mp
In this case, the arguments are 'command' and 'timeout'.
Technical documentaton about the Methods and the necessary arguments: http://technet.microsoft.com/en-us/library/dd789056.aspx. (not the best documented features sadly).
You can also take a look at the MP library: Microsoft.Unix.Library.mp
Links
Subscribe to:
Posts (Atom)


